How to Setup Blog Using WordPress in 5 Easy Steps
Hey fellow bloggers!. So, you’ve taken the first step to launch your WordPress blog – awesome!. But before we dive into the exciting world of content creation, let’s talk about something crucial: setting up the foundation for success. Trust me, I’m not going to bore you with tech jargon, but we need to ensure your blog is not just a space on the internet but a well-crafted, user-friendly platform that keeps your readers coming back.
It is important before continuing, you must follow the steps to install your blog with WordPress, you can see our guide. Now, let’s continue.

To help you navigate this maze, we’ll delve into the intricacies of blog hosting, exploring vital considerations and uncovering why, after extensive research, I chose SiteGround as my hosting sanctuary.
Setting Up Your WordPress Blog for Success
Importance of Basic Settings in WordPress
Setting up your WordPress blog might sound like a daunting task, but it’s like building a house – you need a solid foundation. Before we jump into creating killer content, let’s nail down some essential configurations to make your blog not only attractive but also functional.
And guess what?. It’s a breeze, especially if you’ve got WordPress installed on Siteground.
1. Choose a Relevant Site Title
Your site title is like the name of your favorite book – it should grab attention and leave a lasting impression. Here’s how to choose a title that resonates with your audience:
Steps to Choose a Relevant Title:
- Identify Your Niche: Know your blog’s focus. Are you into fitness, travel, or perhaps a tech enthusiast? Your title should reflect that.
- Research Keywords: Use tools like SEMrush’s title generator to explore keyword-rich titles. It’s not just about creativity; it’s about being discoverable.

Defining the Title in WordPress:
- Login to Your WordPress Dashboard: Simple, right? Head to your WordPress dashboard and navigate to ‘Settings.’
- Select ‘General’: Here, you’ll find the space to enter your blog title. Don’t rush; take your time to choose something compelling.
- Save Changes: Voila!. Your blog officially has a name.

And there you have it – a title that sets the stage for your blogging journey.
2. Use a Convincing Tagline
Now, let’s add some flair with a catchy tagline. Think of it as your blog’s elevator pitch – short, sweet, and intriguing.
Process to Write a Convincing Tagline:
- Know Your Voice: Is your blog humorous, informative, or serious?. Align your tagline with your brand voice.
- Highlight Unique Selling Points: What makes your blog stand out?. Incorporate these elements into your tagline.
Defining the Tagline in WordPress:
- Navigate to ‘Customizer’: In your WordPress dashboard, find ‘Appearance’ and click on ‘Customize.’
- Select ‘Site Identity’: Here, you can easily add your tagline below your site title. Keep it snappy and memorable.
- Publish Changes: Your blog is now armed with a tagline that leaves an impression.
And just like that, you’ve added a touch of personality to your online space.
Pro Tip: Stuck in tagline limbo?. The Designhill Slogan Maker can be your trusty ally in crafting a tagline that sticks.

3. Installing Theme in WordPress – Astra
Why Astra, you ask?. Well, it’s like the interior design of your house – clean, customizable, and visually appealing. Let’s walk through the process.

Why Choose Astra Themes:
- Lightning Fast: Astra is designed for speed, ensuring your visitors don’t get frustrated waiting for your content to load.
- Customization Galore: From headers to footers, Astra gives you the power to make your blog look exactly the way you envision it.
Installing and Activating Astra in WordPress:
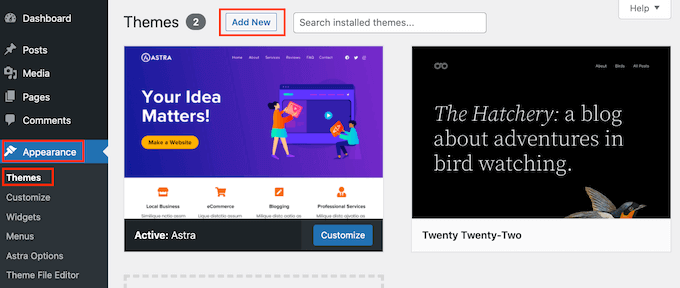
- Navigate to ‘Themes’: In your WordPress dashboard, go to ‘Appearance’ and select ‘Themes.’
- Click ‘Add New’: Search for ‘Astra’ and click ‘Install.’
- Once installed, hit ‘Activate‘
Global Design Adjustments in Astra:
- Customize Astra: Under ‘Appearance,’ find ‘Astra Options’. Here, you can tweak global design settings like colors, fonts, and layout.
Customizing Header and Footer in Astra:
- Header and Footer Builder: Astra provides an intuitive builder for both. Experiment with different layouts and elements until you find your perfect combination.
- Save Changes: Don’t forget to save your hard work!
Install Starter Templates (Free) Plugin
Starter templates are like a shortcut to a stunning website – pre-designed layouts and styles that you can easily customize to suit your brand or personality. No need to start from scratch; these templates offer a head start in the race to a visually appealing and functional website.
Now, let’s talk about the star of the show: the Astra Starter Templates plugin. If you’re not already familiar, Astra is a powerhouse WordPress theme, and its Starter Templates is a game-changer for those seeking a cost-effective way to revamp their site’s look and feel.
Getting Started:
Installing the Plugin Astra Starter Templates:
First things first, let’s get Astra Starter Templates up and running on your WordPress site. Follow these straightforward steps:
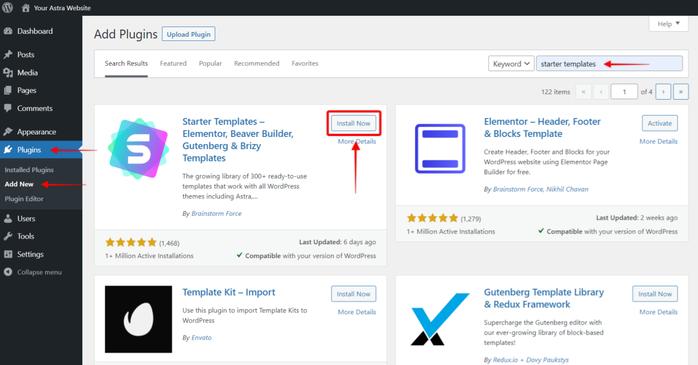
- Access Your WordPress Dashboard: Log in to your WordPress admin panel.
- Navigate to Plugins: In the left sidebar, find and click on “Plugins.”
- Add New Plugin: Hit the “Add New” button at the top.
- Search for Astra Starter Templates: In the search bar, type “Astra Starter Templates”
- Install and Activate: Once you find it, click “Install Now” and then “Activate“
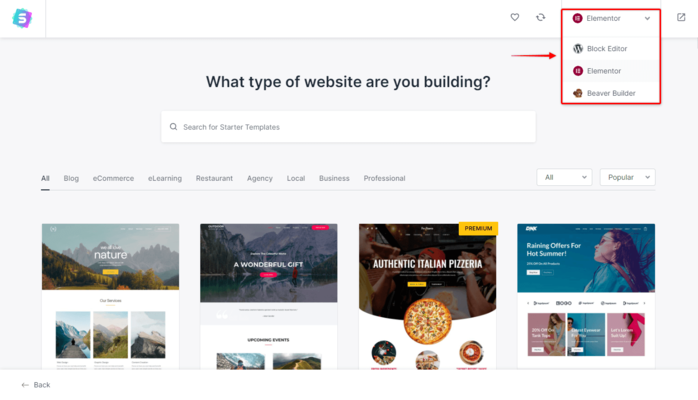
- Explore the Template Library: After activation, you’ll notice a new menu item – “Astra Sites”. Click on it to explore the template library.
Choosing and Importing Astra Template:
Browsing the Template Library:
Now that Astra Starter Templates is live on your site, let’s dive into the treasure trove of templates:
- Filter Options: Use the filtering options to find templates tailored to your niche or purpose. Whether you’re a blogger, business owner, or creative professional, there’s a template for you.
- Popular and Trending Templates: Check out the popular and trending templates. These are often tried-and-true designs that resonate with a wide audience.
- Different Template Styles: Astra offers a variety of styles, from minimalistic to bold and vibrant. Browse through different templates to find one that aligns with your vision.
Astra Starter Templates Premium:
Ready to elevate your website even further?. Consider upgrading to Astra Starter Templates Premium.
Unlock exclusive features:
Elevate Your Website Further
Astra Pro
- Unparalleled Flexibility, hundreds of customization controls — header, footer, sidebars, menus, and more.
- Site Builder, Design custom headers, footers, single pages, posts, archives, and WooCommerce pages effortlessly, without any coding.
- Product Updates
- 2M+ User Community
- Extensive Guides and Video Tutorials
- Risk-Free Guarantee
- 4.7 Trustpilot rating
I earn a commission if you make a purchase, at no extra cost to you.

Don’t miss out on this opportunity to stand out from the crowd. Upgrade Astra Now and watch your website transform into a true masterpiece!
Essential Astra Customization Tips:
Replacing Demo Content:
- Access the Customizer: Go to “Appearance” and click on “Customize”
- Navigate to Content: Look for a section related to content or homepage settings.
- Replace Demo Content: Swap out the demo text and images with your own. This step personalizes the template to align with your brand.
- Page Builder Integration: Astra seamlessly integrates with popular page builders like Elementor and Beaver Builder. Use these tools to tweak page layouts effortlessly.
- Customization Options: Explore the customization options within the WordPress Customizer to fine-tune design elements like colors, fonts, and spacing.
Astra Starter Templates provides a robust solution for those seeking an easy, cost-effective way to elevate their WordPress websites. With a user-friendly installation process and a diverse template library, you’ll be well on your way to creating a website that stands out from the crowd.
So, what are you waiting for?. Install Astra Starter Templates today and watch your website transform into a digital masterpiece!
Congratulations!. Your blog is now wearing the Astra theme with pride.
4. Add a Logo to WordPress Blog: Stamp Your Brand’s Identity
Importance of a Logo: It’s Your Digital Signature
Think of your logo as your digital signature in the vast blogosphere. It’s the symbol that readers will associate with your brand. It’s not just an image; it’s your identity in a crowded online space. So, let’s not just settle for a blog – let’s build a brand.
Create a Logo: Effortless Branding with LogoAI
Creating a logo might sound daunting, but fear not – we’ve got LogoAI to the rescue.
Head over to LogoAI and let the magic happen.
It’s not just easy; it’s fun. Plus, it saves you from the headache of hiring a designer or spending hours on complicated software.
Let your brand shine effortlessly.

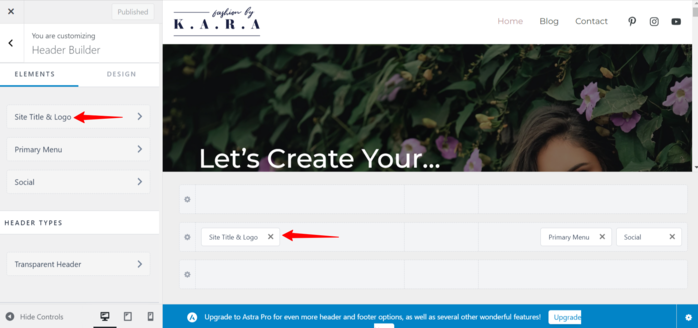
Go to Appearance > Customize > Header Builder to access the Header Builder.
Simply click on the element in the visual header builder beneath the preview or in the elements list on the left to access the element settings.
5. Read and Write Configuration Optimization: Craft Content Like a Pro
Your blog’s got style, and now it’s time to ensure the substance is just as good. Let’s optimize those reading and writing settings.
Reading Settings: Guide Your Readers Smoothly
Navigate to ‘Settings‘ on your dashboard and click on ‘Reading‘
Here, you can set your front page displays, ensuring your readers land on the content that matters most.
Choose between a static page or your latest posts – it’s all about guiding your audience smoothly through your digital realm.

Comments Settings: Foster Engagement
Blogs thrive on conversations. In your ‘Settings‘, click on ‘Discussion.’ Here, you can fine-tune how comments appear, moderating discussions effectively.
Encourage engagement and keep the trolls at bay by setting up comment rules and notifications.

Let’s Get This Community Buzzing
Please share your experiences setting up your blog and invite your readers to do the same. Drop a comment below and let’s create a community where we learn and grow together.
Your blog is your kingdom, and it’s time to rule it.
Click through your WordPress dashboard, ensuring you’ve covered all the essential configurations we discussed – from titles to themes, logos to settings.
Your blog is a reflection of you – make it shine.
Now that your blog is set up, it’s time to give it some substance. Create essential pages for Blog like ‘About Me,’ ‘Contact,’ and ‘Start Here’. These pages add depth to your blog, giving your readers a roadmap to navigate through your content.
Happy blogging!